Different types of Flagstone

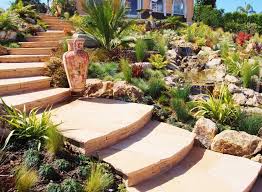
So as the “Flagstone Specialists” we get a lot of calls regarding flagstone. The first thing people ask is: “how much does flagstone cost?” That’s tough to answer, and if I can use an analogy, its like calling a supermarket and asking “how much are your vegetables?”

Let me explain why.  Flagstone is a generic term for any sedimentary stone split into layers and laid as “flags” in a pattern on the floor. There are many types of stone that are typically quarried and laid in this manner.

I’ll list a few of the types of flagstone we carry:

Sandstone

This stone commonly found in the Southwest states, like Arizona, is a sedimentary stone formed by layers of sand.  The color patterns are soft pastels and range from beige to red.  Our Arizona Sandstone comes in colors called “Buckskin” which is a gold, “Bucksin” which tends to go from gold to peach, “Rosa” which is a deep pink, and “Red Sedona” which is a terracota red.

Pros: Tends to stay cooler in summer, holds up well in most applications: driveways, walk ways and patios. Very cost effective.

Cons: Very porous and tends to absorb water which can cause damage in colder climates. Due to the porosity it can absorb oil and grease easily. So we recommend good sealing after installation. Some colors can be soft and flaky.

Quartzite

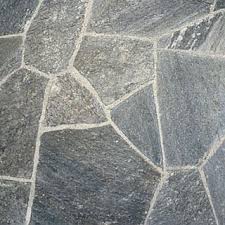
This flagstone commonly found in mountainous areas of Oklahoma, Idaho and Utah, is a form of metamorphosed rock with a glossy smooth surface.  It looks like it has speckles of silver, called mica. The colors are generally greys to golds or a blend. There are some reds, pinks and greens as well but are not as common.  We stock Idaho Quartzites in “Silver”, “Charcoal” and “Gold” at our stores.

Pros: This is a very hearty stone, resistant to wear and tear.  Holds up well in cold weather or rain and stands up to chemicals.  Its a great non-slip surface and is more resistant to staining than sandstone.

Cons: Because it is a hard stone, it is harder to shape and isn’t as easy to form with chisel and hammer.  It also requires a bit more maintenance, regular cleaning and resealing, due to the rough, textured surface.

Bluestone

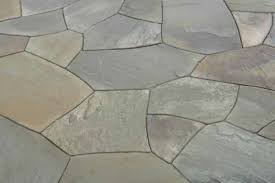
This stone which comes from the Northeast, usually Pennsylvania and New York, is a blue-green sandstone but denser than the variety found in Arizona.  Colors range from blue grey to khaki to purple. Our Pennsylvania Bluestone comes in three varieties: Blue Blue, Full Color (which is a blend of all three colors) and Lilac. It’s also very popular in cut patterns or Ashlar pattern, which is a combination of squares and rectangles. We also carry treads for stairs and pool copings.

Pros: This is a tough, dense paver with a nice grip for a non-slip surface.  It holds up well in the cold climate of the Northeast.

Cons: Must be sealed to preserve its color, resist any chlorine or saltwater in pools or spas, and to protect it from scratching or staining.

Slate

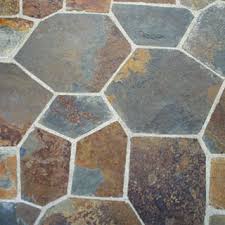
This stone is commonly found in the Northeast, the most common from Vermont.  Most of what we carry here is from India or China.  Slate is a metamorphic rock that is layered with clay like minerals.  They common in a multitude of colors and are often multicolored.  You can find slates in every color of the rainbow from green to blue to red.

Pros: This easy to work with stone can be shaped and formed with no problems. Its ideal for wall cladding as well as for flooring.

Cons: Easily splits and is not usually found in large slabs.  It requires sealing for stain resistance and to reduce efflorescence.

Limestone

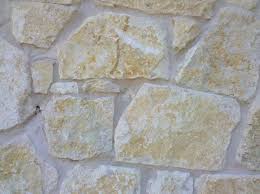
This light colored stone from the plains of Texas and Indiana is a sedimentary rock composed of calcite. Its a natural split surface that can be polished.  The colors tend to lean towards the creams, beiges or greys. We carry a stunning Limestone from Texas called Classic Cream.

Pros: This stone which can be found in ancient Greece and Rome, is long lasting and weather resistant.  It holds up well in most climates and is easy to work with.

Cons: Its very heavy and susceptible to acid.

Travertine

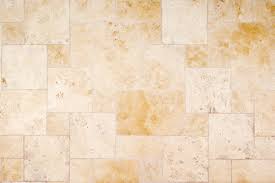
This variety of limestone is found in some Western states, like Texas and Oklahoma.  But most of what we sell here is from Mexico, Turkey or the Middle East. Travertines tend to range from whites to beiges to golds.  The surface can be pitted or have tiny holes, which are good for grip when used outdoors. Or they can fill those holes and have a very smooth finish or be polished and used inside for kitchens, bathrooms or other interior floors and walls.

Pros: Durable, higher end stone. Stays cool for indoor surfaces. Can be very cost effective.

Cons: Can be difficult to maintain if surface is very pitted.

I hope this has helped explain a few of the differnences you’ll need to know when selecting the right type of flagstone for your next landscaping project.  And if you have any other questions please feel free to contact one of our 4 Los Angeles area stores.


DIY Projects: Left Over Pallets


I get a few calls a week from customers asking me: “what can I do with these left over wooden pallets we got from you?”

The simple answer is to throw them away or bring them back to us and we can always reuse them.

But the fun and creative answer for those of you with a little bit of skill and since of adventure is turn those pallets into a fun DIY project.

If you look online or on Pinterest, you’ll see tons of creative uses for these pallets.

First, determine what type of pallet you have.  Then it will be easier to figure out a good use for them.


Once you’ve established the type, you can get to work dismantling and reassembling them. All you need is a hammer, some paint and nails, construction adhesive and an imagination.

Here are a few of my favorites:


                                                Pallet bench

                                            Pallet desk

                                             Pallet planter

                                   Pallet Shelf

                                           Pallet swing

                                     Pallet work bench

Backyard Trends: Gabions


Since selling stone is our primary business, I am always looking for great ways to display them, whether its flagstone, gravel or boulders and cobbles.  One of the most beautiful ways of displaying boulders and cobbles are Gabions.

For those who don’t know, gabions are a traditional retaining wall system comprised of steel mesh ‘baskets’ filled with rocks.    In landscaping, gabion walls can support an earth wall, stabilize the soil, prevent erosion, and more.

Gabions are nothing new.  They have been used in engineering through out history, from ancient Egypt to medieval Italy. Derived from an old Italian word, gabbione, meaning “big cage.” The cages were originally wicker, but now are usually a welded mesh made of sturdy galvanized, coated, or stainless steel wire that won’t bend when filled with rocks.

What are the benefits of gabion walls?

History has shown that gabions are a lasting solution to soil erosion as well as hillside retention. Other reasons to use them:

  • Aesthetics: Gabions look natural and can tie a house to the landscape by using filler materials excavated from the site or the local terrain.
  • Environmental friendliness: When onsite material is used as filler, transportation costs and associated fuel consumption are eliminated.
  • Sustainability: Used as shade screens in hot climates, gabion walls provide passive cooling; they allow air to move through, providing ventilation.
  • Permeability: Gabions are permeable and free-draining; they can’t be washed away by moving water.
  • Easy installation and built-in strength: The stone fill settles to the contours of the ground beneath it and has such frictional strength that no foundation is required. In fact, the wall’s strength and effectiveness may increase with time, as silt and vegetation fill the voids and reinforce the structure. Another advantage over more rigid structures: Gabions can conform to ground movement.
  • Long-lasting.

Gabions can serve many purposes other than building walls.  They are used for small fences, benches, posts, planter boxes, even barbeque pits or grills and more.  Here are a few cool ones I’ve seen:

Stone is not the only material used to fill gabions.  You can use reclaimed brick or roof tiles, broken concrete, broken glass, wood or branches or anything else you can imagine…but the heavier the material the better it will serve for retaining walls.


Different Types of Plants and Ground Cover

When choosing the right ground cover to use around pavers or flagstone, you want them to meet a few criteria:

  • Look for plants that are tough so you don’t have to tiptoe around them.
  • Choose short plants that won’t obstruct your path, and plants that are suited to the area’s light exposure (is the area sunny or shady).
  • Find plants that spread to fill the space around them make growing plants between pavers easier.

And living in California, drought is also a major concern. However, it’s very possible to grow a gorgeous, water-wise garden. You can find drought tolerant plants for nearly any situation, including heat-loving ground cover plants and ground covers that withstand drought.

The best drought tolerant ground covers share several common characteristics. For example, drought-tolerant plants often have small or narrow leaves with a smaller surface area and reduced moisture loss. Similarly, plants with leaves that are waxy, curled or deeply veined retain moisture. Many drought tolerant plants are covered with fine grey or white hairs, which help the plant reflect heat.

Here are a few great options:

Irish Moss: Irish moss adds soft, spongy texture to paths in shady areas. Only a couple of inches tall, it doesn’t create an obstruction. It’s usually sold in flats like sod. Just cut it to fit and lay it where you want it to grow. It is sometimes sold as Scottish moss.

Creeping Thyme: .Creeping Thyme grows only an inch or two tall, and you’ll enjoy its pleasant fragrance. You can plant it in the sun, where it grows flat, or in the shade where it forms little hills. It bounces back after short periods of dry weather, but you’ll need to water it if the dry weather lasts very long.

Baby’s Tears: Baby’s tears is another selection for shady locations. They are often sold as houseplants, but they also make wonderful little plants to grow within pavers. It isn’t for everyone because it only grows in USDA zones 9 and warmer. The pretty foliage forms mounds about 5 inches tall.

Blue Star Creeper: Creepers are perfect as a lawn substitute, excellent between stepping stones, under roses, around ponds, patios and decks. Isotoma fluviatilis is a show stopper in a topiary and is amazing over flower bulbs. Super easy to grow and can bloom spring through summer if conditions are right.


Creeping Sedum: Sedums do their best in lean soils and not much water – because in those conditions the weeds DON’T do well. In other words, in the world of groundcovers it’s all about the competition – can a plant out-compete the weeds or not? So first, making your site inhospitable to weeds before planting gives sedums greatly reduces the long-term maintenance from then on (less weeding).

DIY Projects: Left Over Cinder Block

I’ve been asked by more than one customer: “what can I do with all those left over cinder block we bought for our wall?” ( as well as brick, or flagstone, or pallets, but we’ll cover those in other posts).

Aside from returning them to one of our 4 locations or paying for a dumpster or someone to haul them to the local waste management site, why not use them in a fun and creative DIY project.

Other than the cinder block, you might need a few other items:  2×4’s, some mortar or block adhesive and paint, and we can take those construction leftovers and make something cool to spruce up the yard.

Here are a few ideas:

Back yard bench

Steps in your garden

Book shelves

Back yard seating area


Candle or art display


Fire pit

Hopefully you can get some ideas from these pictures, and please feel free to share your finished products with us here.


Backyard Trends: Fire Pits


Let’s talk about Trends for 2017.  Talking to contractor clients, landscape architect and designers, we are seeing that home owners are looking for Complete Outdoor Living Areas.  Although this isn’t a completely new fad, more people are looking to add value to their homes while at the same time extending living or entertaining spaces to the back yard.

These outdoor living areas can range from whole outdoor kitchens and entertainment centers, to a barbecue or poolside bar area.  And can run you upwards of $50,000 or more.

Do you have an area of the back yard that you’ve been contemplating turning into an Outdoor Living Space?

Want to build a comfortable seating area, that will serve as a great place to entertain?

Why not build a fire pit?

If you take on this project yourself, you could spend closer to $500 if you have the patience and are willing to use some elbow grease. Building a fire pit can be an easy project, whether you are a weekend DIYer or this is the one and only time you’ll ever work in the back yard, we are confident you can get it done!

For our first blog post we will show you how to put a fire pit together.  I don’t have any photos of the process, but I will show you a few different prefabricated fire pit options from local suppliers, including Belgard, Olsen, Orco and Angelus Pavers.

HOW TO BUILD A FIREPIT

Materials used:

  • Pick your block.  There are a lot of options when it comes to fire pit blocks. Here are a few of the brands and styles we work with:

Angelus Planter Wall Blocks

Belgard Country Manor Fire Pit Kit

Belgard Weston Fire Pit Kit

Olsen Infinity Fire Pit Kit

Orco Keystone Country Manor

Orco Jumbo Nursery Stone

Instructions.
1.  Check on your city and local codes and restrictions to find out what is required for a fire pit.
2.  Chose an open spot, 10 to 20 feet away from trees, bushes, grass and other flammable items.
3.  If building in none paved area, use rake and or shovel to clear out grass and debris and smooth out fire pit area. If on paved area, just make sure the area is clean and hopefully leveled.
4. By now you have already picked the shape of your pit.  If you plan to create a circular pit, you might want to mark out the area first using a measuring tape and marking the ground with spray paint.  (Have someone stand in the center of the fire pit area with the end of a measuring tape and the 2nd person can walk around at the desired measurement and mark the ground in a circle.)
5. Lay out your first layer of retaining wall bock directly on the ground.
6.  Dig out about 4 to 6 inches of dirt from inside the fire pit circle.  (You may need to dig out more or less depending on your local code.)
7.  Stack the second and third layer of retaining wall block.  Fill the bottom of the fire pit with  4 to 6 inches of decomposed granite, sand or pea gravel. Use a brush to clean debris from the surface of the previous layer. Overlap the layers of stone, leaving three or four random gaps between stones in every course. The gaps allow the fire to draw air into itself. We dry-stacked the stone. They may get out of alignment, but realignment is easy.
8.  Add the 4th row of retaining wall block.  You may chose to glue the 4th row to the third row with landscape retaining wall adhesive.  If you do this, just follow the directions for the adhesive.
9.  If creating a seating area, add the rest of your gravel, back filling around the fire pit.  Smooth out, add chairs, outdoor string lights and enjoy!