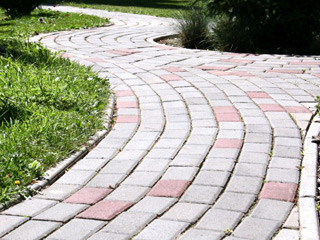
DIY Adventures - How to Build a Paver Walkway
 Sometimes, all an outdoor living space needs is a walkway, connecting it to the home, or other buildings at a commercial property. While not necessarily 'easy', this type of project can be done by the home owner, as you'll see here. Let's get into it:
Step #1: The first step to building a paver walkway is deciding on the style and pattern. Consider design options like jack-on-jack, running bond, herringbone, or pinwheel. As a general rule, the simpler the paver design, the easier the walkway will be to install. Once you've picked a design and a paver, determine how much product you will need (pavers, base material, fill sand, paver sand, etc.), and ensure that product is available to you. Then, begin prepping your site by laying out the area for your walkway. Use stakes, strings, and yard tape measures to determine and mark exactly where the walkway will go. For curves in your walkway, use two garden hoses and a 2×4 board cut to the width of your walkway to determine these lines. (Remember, if your walkway runs alongside your home, ensure that the walkway slopes away from the home by about a 1/4-inch drop every foot.
Step #2: Time to start digging! Now that your layout is measured and marked, begin by removing the sod and dirt from the walkway. The total depth of sod and dirt removed will depend on the height of your pavers, plus the amount of base sand you plan on using (usually three inches). Once you have the site excavated to the desired depth, use a plate compactor to compact the soil, then install a length of weed barrier on top of the soil (this will prevent weeds from growing up through your pavers!)
Step #3: Next, install your layer of sand. As a tip, use two 1/2 inch PVC pipes laid lengthwise on top of your weed barrier as a measuring gauge to determine if you have enough base sand installed. Then, use a 2×4 board and pull it along the pipes to level the sand. Remove the pipes, add sand as needed, and level again with your 2×4 board until you have a uniform, level surface. Now you can set paver panels down on top of the sand. Paver panels are square, flat base products, and you can use them on top of your paver base layer but below the pavers themselves. They create a flat, level, stable, yet flexible base on which to rest your pavers. A wise investment as they make installation a breeze and prevent pavers from sagging into the base layer over time!
Step #4: Now it's time to install the pavers! Start laying the pavers down on top of the paver base panels in the design and style of your choosing. Lay the outer border first and fill in between the borders. Make sure you leave a small gap, about 1/4-inch, between the pavers. Also, use a straightedge if you need to, to keep the blocks in line, and a 2×4 board cut to the width of the walkway to help you stay on pattern with your design.
Step #5: Once your pavers are laid out, install an edging material along the edges of the walkway to keep the pavers in place (use plastic or metal edging material made for this purpose). If you have pavers along the edges of your walkway that won't fit in the designed pattern, use a circular saw with a masonry blade or a wet saw to cut the pavers to the desired shape. Finally, pour jointing sand over the paver walkway, and sweep it into the cracks between the pavers. Voila! Now you have a beautiful, DIY paver walkway!
What's Next?
That wraps up our DIY Pro Tips on how to build a walkway. We hope you found it useful!While you're DIY'ing if you happen to get stuck and all seems hopeless, feel free to reach out to us. We'd love to answer any questions you have.
Just give us a call: 310-410-3108
